Home / Basics / What those order buttons mean
What those order buttons actually mean
Most people guess the first time they open a trading screen. Three tabs, three boxes and two buttons, explained one at a time — including which one beginners press by mistake.
You open the trading page. Three tabs — Limit, Market, Stop-limit. Below them three boxes: price, amount, total. To the right, a green button and a red one. Most people guess at this point and press something. This piece is so you do not have to guess.
There are really only two order types
Strip away the noise. You need to understand two: market and limit. Everything else is a variation.
A market order says: fill me now, at whatever the market offers. You enter an amount, not a price — investor.gov defines it the same way: executed promptly at the best price then available (checked 2026-09). It always fills; the cost is that you do not know the fill price in advance. When the market is moving or your size is large relative to the book, the actual price can differ from the quote you saw. That difference is slippage.
A limit order says: this is my price, fill me if you can. You enter both price and amount. You control the price; the cost is that it may sit unfilled. The definition is not crypto-specific — the SEC’s investor education site says the same thing: a buy limit order can only execute at the limit price or lower (checked 2026-09).
For a first purchase I would use a limit order set near the current price. Not to save a fraction of a percent, but because a limit order forces you to look at the number you are actually paying. A market order fills the instant you press it, and plenty of people only work out afterwards that they bought into a spike.
Maker, taker, and why your fee changes
The order book has resting buyers on one side and resting sellers on the other. If your limit order does not fill immediately it rests on the book — that makes you a maker, providing liquidity. A market order immediately consumes someone else's resting order — that makes you a taker. These two words are industry-wide terminology, not one venue's branding; to see what the two rates actually look like, open Binance's published fee schedule (checked 2026-09 — rates get adjusted, so go by whatever the page shows when you open it).
Most exchanges charge those two differently, and the maker rate is usually lower. Which is the real reason frequent traders prefer limit orders: not just price control, but a cheaper tier. How to read the fee table is in the fee schedule, column by column.
What to look at in the order book
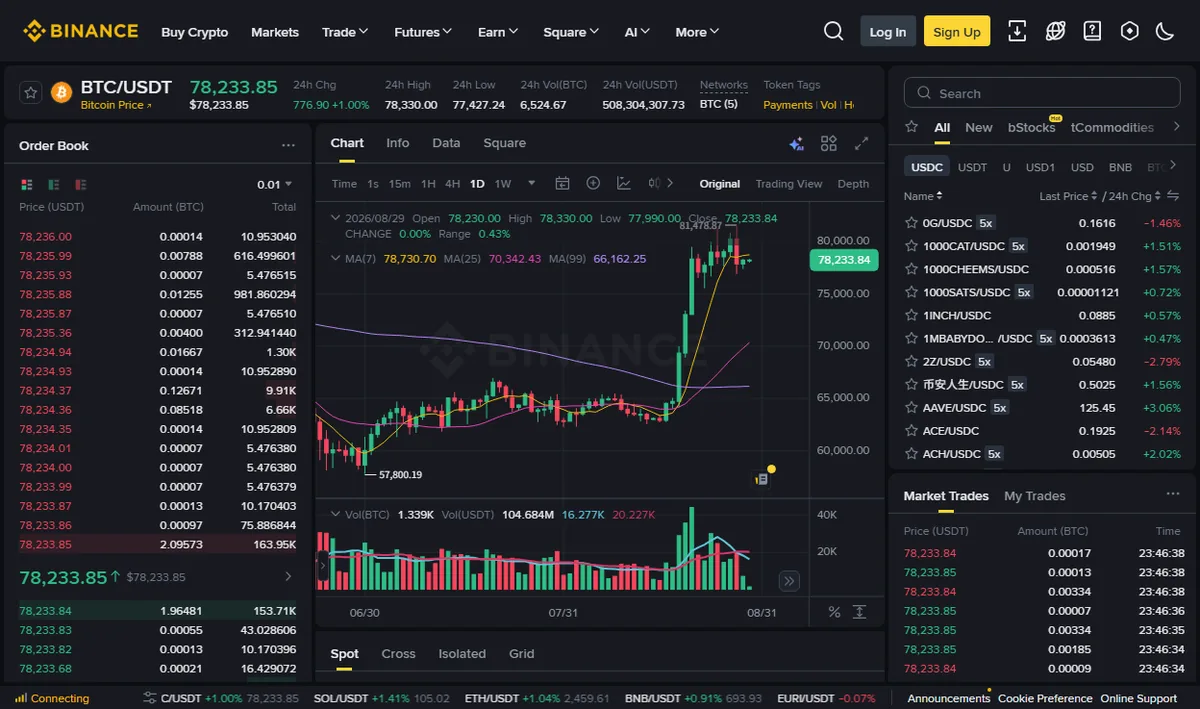
Next to the trading panel there is usually a block of red and green numbers. That is the book: sell orders above, buy orders below, and the gap between them is the spread.
You do not need to trade off it, but there is one very practical use: how wide the spread is tells you how easily you can get out again. On major assets it is narrow enough to ignore. On small ones it can be wide enough that buying and selling immediately costs you several percent. That single glance beats most "analysis".
The other hidden piece of information is depth — how much size sits at each level. If your order is bigger than the resting size at the top level, a market order eats down through worse prices. That is where slippage comes from.
Stop orders: the extra price box
A stop order adds a trigger price. It works in two stages: the price has to reach the trigger, and only then does your actual order go to the book.
The purpose is obvious enough — you cannot watch a screen indefinitely, so you set "sell if it falls to here". It sounds essential, but two things are worth knowing first:
- If the order placed after the trigger is a limit order and the price cuts straight through your level, it may not fill at all. Your stop then did nothing.
- Set the trigger too close and ordinary intraday noise takes you out, after which the price comes right back.
Being honest: I rarely use stops on spot positions. There is no forced liquidation on spot, so I would rather control risk through position size than through a price level that can be swept. Leveraged positions are a different matter — not using stops there is genuinely dangerous — but leverage is not something a beginner should be near.
If the trading screen shows "isolated / cross", "10x", or "open long / open short", you are no longer on a spot page. Leveraged positions can be force-closed in minutes and cost you the entire margin; in violent conditions losses can exceed what you expected. If you are starting out, closing that tab is the correct move.
Four glances before you confirm
- The pairConfirm it is BTC/USDT and not something with a similar ticker. There is usually more than one lookalike.
- The directionBuy is normally on the left and sell on the right, but not on every interface — switch platforms and it can flip.
- The unitAre you entering the quantity of the coin, or the money you want to spend? Those two boxes look almost identical.
- The totalLast, read the total line. If the figure has one more digit than you expected, the problem is usually the previous point.
Ten seconds, all four. How large the first trade should be, and why we suggest starting very small, is in how much to put into the first trade.
One purchase, start to finish
Concepts stick better attached to actions. Here is an ordinary buy, broken into steps. Say you want to spend about fifty dollars on bitcoin.
- Check you actually hold USDTWith a zero balance there is nothing to do on this page. Getting USDT is a separate process — see your first deposit.
- Find the BTC/USDT pairType BTC into the search box; several candidates will appear. Check what follows the slash.
- Switch to the Limit tabThis is deliberate. You want the price field visible.
- Look at the current priceEnter a price near it — slightly above fills faster, slightly below may wait.
- Enter the amount in money, not in coinsMost interfaces let you type how much USDT you want to spend and compute the quantity. Far harder to add a zero by accident that way.
- Read the total lineConfirm it matches what you meant to spend.
- Press buy, then check the order statusFilled orders move to order history; unfilled ones stay in open orders. Sitting in open orders is not an error, it just has not filled.
- Go back to the assets pageConfirm the BTC balance changed. People skip this and then spend the next day wondering whether the trade happened.
Once familiar the whole thing takes half a minute. Slow is fine the first time; the point is knowing what you are looking at.
Other words you will see
| Term | Meaning | What to watch |
|---|---|---|
| Trading pair | What you pay with and what you get, e.g. BTC/USDT | One coin may have several pairs quoted in different units |
| Slippage | Gap between the quote you saw and the price you got | Shows up with size, thin markets, and fast conditions |
| Depth | Size resting at each price level | Thin depth costs you on the way in and on the way out |
| Cancel | Pull an unfilled order back | Usually free — if you mispriced it, cancel rather than hoping |
| Partial fill | Only part of your order executed | The remainder is still resting; deal with it |
| Post-only | An option guaranteeing your order will not fill immediately | Used to secure maker fees, at the cost of possibly not filling |
One habit I keep
Before placing an order, finish this sentence in your head: I am spending this much, to buy this quantity, and if it halves I will do this.
It sounds slightly silly and it filters out most impulse trades, because most people can fill in the first two blanks — and when you cannot fill in the third, that is usually the trade you should not be placing.
A personal preference while I am here: I avoid the one-tap "buy crypto" entry points. They are convenient, but they hide the price, the quantity and the cost, so you do not know what you paid. For someone still learning, visible beats convenient. Once you clearly know what you are doing, use the shortcut by all means.